Color crayons.
Remember...
the smell?
the feel?
the freedom?
the imagination?
the stay inside the lines?
the color outside the lines?
the shavings melted between waxxed paper with the old heavy iron?
the leftover pieces added to paraffin wax to make colored candles at Christmas?
the kid in class that ate them?
the store shelves full of them in the fall?
the crayon box in the desk?
the big fat ones?
the brand new box of 64?
the little box of 8?
the worn out nubs?
the brand new coned-shaped tips?
the built-in-the-box sharpener?
the peeling of the label to get more crayon?
the names...like cornflower blue?
the Ziploc bags for all the leftover stubby pieces?
the melted crayon between the seats in the car?
the scribbling on the walls?
the scribbling under the kitchen table?
the rogue crayon that went through the dryer?
Oh, the simple memories of the crayon.
I love my crayons.
EVEN this little 4-pack from Milton Bradley....!
What memories do you have?
Monday, September 26, 2011
Thursday, September 22, 2011
Life's Little Surprises....
The day before yesterday I stayed home from work, in bed all-day, with a terrible head cold. I was exhausted and in between naps kept wondering who the heck got me sick!! Couldn't be just some random cold germ floating around out there, right? It had to be someone...
Used to be, with three little boys going off to school and coming home with a plethora of plague-like hitch hikers, I was used to fighting off some sort of bug...but, now? What gives?
Was it the guy in Wally World in front of me telling the checker how he was just getting over a bug?
Or was it the checker at the paint store that was hacking into a Kleenex saying how he was just getting over a bout with a bug?
Or was it one of my employees that was feeling a bit under-the-weather but still coming to work?
Whomever it was or wasn't, I was laid up at home on a beautiful, end-of-summer day while my sweet Phillip was at work. When he came home he told me I got a box of magazines from Stampington.
Well, since our shop is about 30 or so miles from home, I would have to wait to see what was in the box.
The next morning, yesterday, I saw the box sitting on the conference room table. "Oh, it's my wholesale order of Life" and then went about my day --- see yesterday's post....
Fast-forward to about 3 p.m.
Ginger and I took a break from over at the Rusty Monkey so we could eat lunch and I could get an E.B. (see day job) freight shipment out. While I was in my office completing a BOL (bill of lading) for the shipment, Ginger was sitting out at the conference table and apparently found the magazines.
She yells to me, "Hey! You didn't tell me you were in Life!"
"Um," I reply, "me neither. What's in there?"
Truly, I had NO idea what could possibly be in there. I am waiting to receive the Premier issue of Mingle - our 25th Anniversary Party is being featured - and I have NOT seen a sneak preview yet!!! Only the little teaser House Ads...and to make my antsy self even more antsier (that's a word, right?)
I've received some emails about how great the article looks....It's driving me crazy, but I SO love surprises!!!
So, back to Ginger...
She, in a most excited voice, yells..."and it's the first article! You're getting closer to the COVER!"
"What? What is?", says me.
"...and Kristen!", says she.
So, I go out there...
"OHHHH! It's the article and photoshoot Kristen and I did at Anahata's place, Papaya Living, over in Ashland!", I finally say.
So, friends, just goes to show, even when you do something and completely put it on the back burner, it can totally be a surprise!!!
***Thanks to Kristen Robinson for trusting me to do the photoshoot for your article.
***Thanks to Anahata for your generosity...you know what I mean!!!
***Thanks to Stampington for another great publication.
***Thanks to Ginger for surprising me...I needed that!
***Thanks to my sweet Phillip for telling me about my magazines coming in...and SO much more!
***Thanks to whomever gave me my head cold....NOT!!!
Wednesday, September 21, 2011
Rusty Monkey...a slooooowwwww reveal.....
As I've mentioned before, a couple friends and I are beginning a new adventure called
Rusty Monkey Vintage Marketplace and Workshop.
The primary location used to be a muffler and automotive repair shop. Fortunately, it doesn't have ANY smells of its previous tenants...oily or petroleum stink. If you've ever been in an unkempt automotive shop, you know exactly the smell I'm talking about.
So, the re-do has been fairly easy to accomplish. Ginger and I have spent her last two days off (not connected days) busy at work.
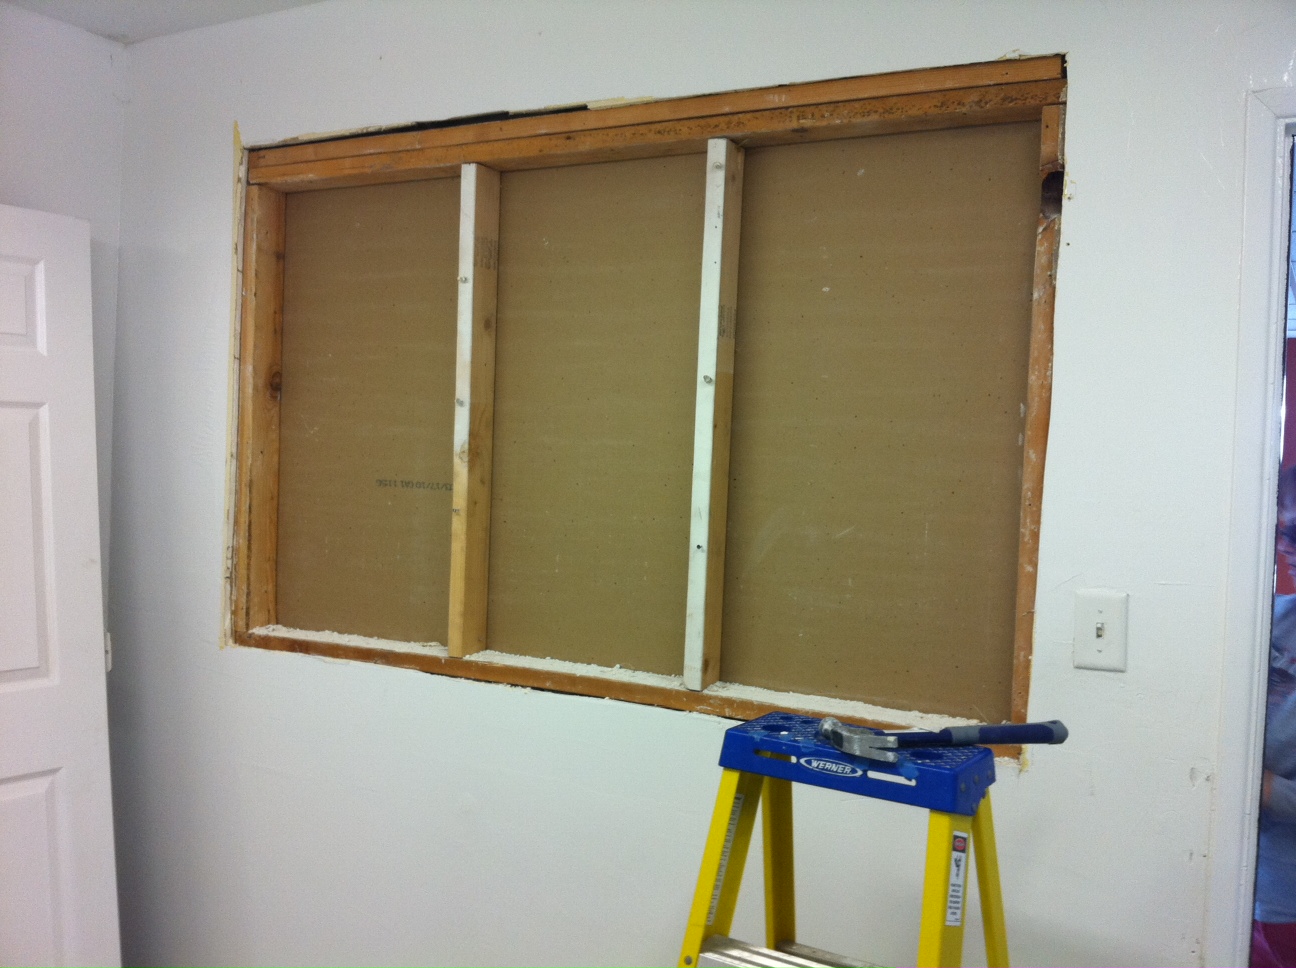
First, we decided to remove an interior window that had been drywalled up to open up the rooms. It worked!
I poked a few nail holes from the backside wall to mark the space on the front (the front was well textured and had no signs of a patch - the back side wasn't so nice and the shoddy tape lines were easy to follow).
We cut and removed the drywall. Fun, but messy. Drywall dust is so..um...dusty!
Next up was the back wall in the little room you could now see through the "window".
Enter the huge, old dictionary I had found a couple years ago for $2.00. Remove the duct tape that was holding the binding together. Unscrew the big ol' barrel bolts. Cut off the 3-hole margins. Ready to apply to the wall using good ol' liquid starch.
Many hours and 10, no, 20 sticky, gooey fingers later, the wall was covered. It looks kind of funny in photos, due to the random-ness of the margins (narrow and wide), but it looks REALLY cool in person. It will be clear-coated to seal and possibly even get a glazing treatment...we'll see.
The window opening got a good squaring up and trimmed out. We still need to fill the brad nail holes and paint, but I think we are on the home stretch!
We've re-painted the gray 1/2 walls with plans to put up chair rail at the existing lines.


A couple weekends ago, Janice and I went to the Jacksonville city-wide yard sale...OH, WHAT FUN THAT WAS...(another post!). I found a vintage canvas tape measure for $1.00. Yep, $1.00!!! Funny thing is it's METRIC! The foot marks are spot-on, but it doesn't have 12 marks in between - only 10. Well, I had the bright idea of using it to embellish the moulding. So with a bit of double stick tape and a few little black brad nails my idea came to fruition. Fun. Easy. Cool!
We've still got a ways to go, but I'm gonna take my recent fortune to heart!
Rusty Monkey Vintage Marketplace and Workshop.
The primary location used to be a muffler and automotive repair shop. Fortunately, it doesn't have ANY smells of its previous tenants...oily or petroleum stink. If you've ever been in an unkempt automotive shop, you know exactly the smell I'm talking about.
So, the re-do has been fairly easy to accomplish. Ginger and I have spent her last two days off (not connected days) busy at work.
First, we decided to remove an interior window that had been drywalled up to open up the rooms. It worked!
I poked a few nail holes from the backside wall to mark the space on the front (the front was well textured and had no signs of a patch - the back side wasn't so nice and the shoddy tape lines were easy to follow).
We cut and removed the drywall. Fun, but messy. Drywall dust is so..um...dusty!
Next up was the back wall in the little room you could now see through the "window".
Enter the huge, old dictionary I had found a couple years ago for $2.00. Remove the duct tape that was holding the binding together. Unscrew the big ol' barrel bolts. Cut off the 3-hole margins. Ready to apply to the wall using good ol' liquid starch.
Many hours and 10, no, 20 sticky, gooey fingers later, the wall was covered. It looks kind of funny in photos, due to the random-ness of the margins (narrow and wide), but it looks REALLY cool in person. It will be clear-coated to seal and possibly even get a glazing treatment...we'll see.
The window opening got a good squaring up and trimmed out. We still need to fill the brad nail holes and paint, but I think we are on the home stretch!
We've re-painted the gray 1/2 walls with plans to put up chair rail at the existing lines.
However, the three window walls have windows that are not at the same lower plane. So, we decided to raise all the moulding and will add more Natural Linen paint to the bottom-most part of the chair rail.
A couple weekends ago, Janice and I went to the Jacksonville city-wide yard sale...OH, WHAT FUN THAT WAS...(another post!). I found a vintage canvas tape measure for $1.00. Yep, $1.00!!! Funny thing is it's METRIC! The foot marks are spot-on, but it doesn't have 12 marks in between - only 10. Well, I had the bright idea of using it to embellish the moulding. So with a bit of double stick tape and a few little black brad nails my idea came to fruition. Fun. Easy. Cool!
The rusty orange wall will also get a mocha glaze and this queen-size box spring frame will go up. Our sign, a rusty piece of corrugated metal (the match to my Home Is...sign) will be layered on top of it. Stay tuned....
We've still got a ways to go, but I'm gonna take my recent fortune to heart!
Labels:
Crafty Stuff,
Girlfriends,
Rusty Monkey,
Treasure Hunting
Monday, September 12, 2011
Good Morning, Gourd Jess....
I just realized from reading a few of my past posts, that I never did do a Good Morning, Gourd Jess reveal.
She was featured in the Autumn issue of Art Doll Quarterly as part of their gourd doll challenge.
On one of my trips to Stampington to pick up a few of my pieces, Jana, the editor of Art Doll Quarterly gave me the 10-cent tour and introduced me to the whole publishing team...from copy editors, to the photographers, to the graphic layout girls. It was a fun to get a peek behind the "curtain".
At the end of the tour, there were a few fold up tables chock full of goodies - props from previous photo shoots, art cast-offs, etc... Jana offered to let me rummage through the goods...
In one of the boxes, was this little 4" brown gourd. I commented to her what a cute little Halloween ghost it would make. It was then she challenged me to make her a gourd doll for the upcoming Fall issue...
The rest is history....
For those of you that ask, "How do you get your art published?" Here is a little sample of my submittal document...UN-EDITED, of course. The actual article was much more personally re-written by Jana herself. Thanks, Jana!
Somerset Art Doll Quarterly
Laguna Hills, CA 92653
Using a standard red plastic drinking straw, I cut ½” sections for the rollers. Using a tiny line of low-temp hot glue (to not melt the straw) and 3” sections of yarn (to ease handling) I wrapped and glued each roller; then trimmed excess yarn and glued them to her head, including the rogue roller that is “falling-out”.
The mug was sculpted using a ball of paper clay shaped over the end of an empty, large diameter ball point pen. The handle was added using a “snake” of clay. Once that was air dried, it was base painted pink, then brown polka-dots and the word “bean” was added. I chose “bean” over coffee, joe, or java, since my husband, Phillip, doesn’t drink coffee and when offered, replies, “I don’t do bean!”
With Super Sculpey clay, her hands and slippers were sculpted over thick wire arm and leg (with knobby knees!) armatures that were painted as well. Her slippers would be no other than the fuzzy-pink-slippers every woman wears…wink! Once dry, darker pink socks, with white polka dots and white lace trim were added. The flowers were cut from trim with a touch of white painted detailing.
Microfiber cloth
Matte Mod Podge
Paper clay
Super Sculpey
Pom pom trim
Fabric flower trim
Red plastic straws
Multi-color yarn
12-ga wire
Book
Printed paper text
Low-temp hot glue
Glue gun
Devcon 2-part adhesive
Mechanical pencil
Sewing needle, white thread
Paint brushes
End Lines
Tina Schiefer lives in Grants Pass, Oregon and enjoys creating mixed media art using found objects and cast-offs. She has previously been published in various Stampington & Co. publications.
Tina welcomes emails at patinamarie@gmail.com or visit her blog at patinamarie.blogspot.com to learn more about her hopes, dreams, and reality.
Cheers!
She was featured in the Autumn issue of Art Doll Quarterly as part of their gourd doll challenge.
On one of my trips to Stampington to pick up a few of my pieces, Jana, the editor of Art Doll Quarterly gave me the 10-cent tour and introduced me to the whole publishing team...from copy editors, to the photographers, to the graphic layout girls. It was a fun to get a peek behind the "curtain".
At the end of the tour, there were a few fold up tables chock full of goodies - props from previous photo shoots, art cast-offs, etc... Jana offered to let me rummage through the goods...
In one of the boxes, was this little 4" brown gourd. I commented to her what a cute little Halloween ghost it would make. It was then she challenged me to make her a gourd doll for the upcoming Fall issue...
The rest is history....
For those of you that ask, "How do you get your art published?" Here is a little sample of my submittal document...UN-EDITED, of course. The actual article was much more personally re-written by Jana herself. Thanks, Jana!
Somerset Art Doll Quarterly
Attn: Jana Holstein
22992 Mill Creek, Suite BLaguna Hills, CA 92653
Submittal Title: Good Morning, Gourd Jess
Inspiration and Description
On a recent trip to California, I “acquired” a 4” dried gourd with the challenge to create an art doll. Admittedly, I had never created a doll from a gourd, or for that matter, any doll from scratch. Sure, I’ve dressed up dolls before, but making one from scratch, using a gourd, was intriguing.
On the long ride home, I closed my eyes, and let my mind wander. Of course, the play on words “gourdgeous” came fast and that soon evolved to designing a doll that epitomizes what the stereo-typical woman goes through to stay that way – a peek into her glamorous morning routine.
Good Morning, Gourd Jess was born.
Technique
Beginning with the mottled, brown gourd, I added a dried, sculpted paper clay nose using Mod Podge. Knowing my girl would be more stylized than a perfect-porcelain, I did not stress over adding dimensional cheek bones, brow or chin. Once dry, the entire gourd was coated with peach paint. Using a fine tip mechanical pencil, I sketched her eyes, brows and lips; then painted in those details. Her avocado facial mask was next. I applied the first base coat, then built-up the thickness using heavier coats to give it the illusion of smooshed avocado.
Using a standard red plastic drinking straw, I cut ½” sections for the rollers. Using a tiny line of low-temp hot glue (to not melt the straw) and 3” sections of yarn (to ease handling) I wrapped and glued each roller; then trimmed excess yarn and glued them to her head, including the rogue roller that is “falling-out”.
The mug was sculpted using a ball of paper clay shaped over the end of an empty, large diameter ball point pen. The handle was added using a “snake” of clay. Once that was air dried, it was base painted pink, then brown polka-dots and the word “bean” was added. I chose “bean” over coffee, joe, or java, since my husband, Phillip, doesn’t drink coffee and when offered, replies, “I don’t do bean!”
With Super Sculpey clay, her hands and slippers were sculpted over thick wire arm and leg (with knobby knees!) armatures that were painted as well. Her slippers would be no other than the fuzzy-pink-slippers every woman wears…wink! Once dry, darker pink socks, with white polka dots and white lace trim were added. The flowers were cut from trim with a touch of white painted detailing.
Her traditional white terry robe and bathmat were sewn from a dollar-store microfiber wash cloth. Random splotches of pink & white paint were added to the mat; then it was trimmed with a strand of mini-pom poms. Openings were cut into the mat and divots cut into the base of the slippers to allow the adhesive to bond to the book base. The book page edges and the printed text were Mod Podge sealed.
Tools & Materials
4” dried gourd
Acrylic paintMicrofiber cloth
Matte Mod Podge
Paper clay
Super Sculpey
Pom pom trim
Fabric flower trim
Red plastic straws
Multi-color yarn
12-ga wire
Book
Printed paper text
Low-temp hot glue
Glue gun
Devcon 2-part adhesive
Mechanical pencil
Sewing needle, white thread
Paint brushes
End Lines
Tina Schiefer lives in Grants Pass, Oregon and enjoys creating mixed media art using found objects and cast-offs. She has previously been published in various Stampington & Co. publications.
Tina welcomes emails at patinamarie@gmail.com or visit her blog at patinamarie.blogspot.com to learn more about her hopes, dreams, and reality.
Cheers!
Labels:
Crafty Stuff,
Featured Mixed Media
Subscribe to:
Posts (Atom)