Showing posts with label Ice Resin. Show all posts

Tuesday, January 22, 2013

Folly...a parasol assemblage step-by-step

Recently, I've had a couple of people comment "I wish I was in your head!"..."How did you come up with THAT?"... "I would have never thought of THAT!"

Well, join me for a few moments and I'll show you what inspired me to create Folly...my mixed media parasol assemblage.

But first...let me just say, that I'm not a morning person, per se. I do my best thinking either while I'm in the shower...with my eyes closed, while I'm washing my hair...It's something that I started doing when the three boys were little...If you're a mom, you know that shower-time, locked in the bathroom is PEACE ON EARTH and the best time to be with your OWN thoughts!!!

or

At night, while I'm trying to fall asleep... When that "good idea" strikes, I can stay awake for hours...then be exhausted when it's time to wake up...probably why I'm not a morning person...!

So, with this particular creation, I was trying to think "Explore Beyond" - Spellbinders' trademark.

I thought of several things.... I won't bore you, but then I fixated on a chandelier idea...then I thought, what if I turned it upside-down...then...then...then... It was past 2 a.m!

Well, I happened to have two mis-matched light fixtures collecting dust in my studio. One with a wooden finial and another with a glass finial. After a bit of contemplation, I decided to disassemble BOTH and create a NEW object d'art.

I began the process on Friday night and spent a full Saturday - between Friday's wedding and Sunday's baby shower...getting it done! WHEW!!! Love my mochas! LOL

***

So, here we go...

wood finial chandelier - I used the arms, ceiling medallion, lower wooden finial and various hardware pieces

glass finial chandelier - I used the scallop cups, center glass finial and the hanger hardware
 
 
the disassembly process ... sorting and deciding

the assembly process begins...remove the lacy cups and add the scalloped cups ...
different shape...different direction...different effect
 
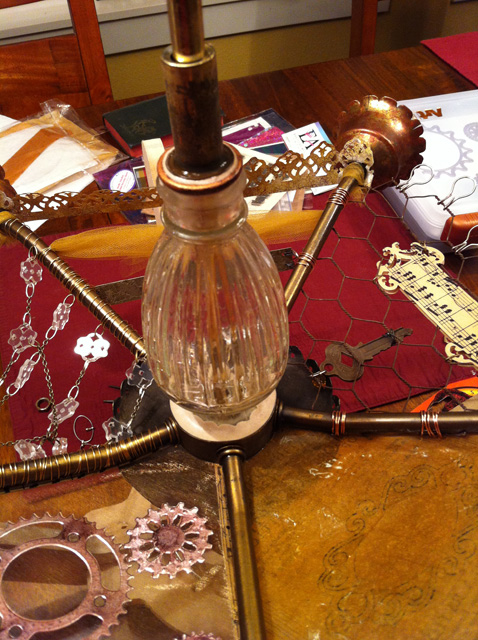
final top finial stack selection
 
finial stack test fit for design aesthetic

pattern-making for player piano, resin-paper section
  arm spacing traced, pattern cut, and test fit to arms

vintage Rythmodik player-piano music roll


test layout
 after cutting the music paper, a Fancy Tags Two die was positioned to be used as a stamp

using a Fancy Tags Two die and an Art Bin magnetic storage plate as a stamp positioner .. and the leaf seam/edge of my dining room table as a T-square, the die was inked with black Staz-On ink
 
Radiant Rain Shimmering Mist was spritzed over the sheet music


using the Grand Calibur, Pendants Lattice die, and clear shrink plastic,
numerous pieces were cut and shrunk for the clear jewels section

after shrinking

initial jewel layout that did not become part of the final design -
 a horizontal pattern was a better design between the arms

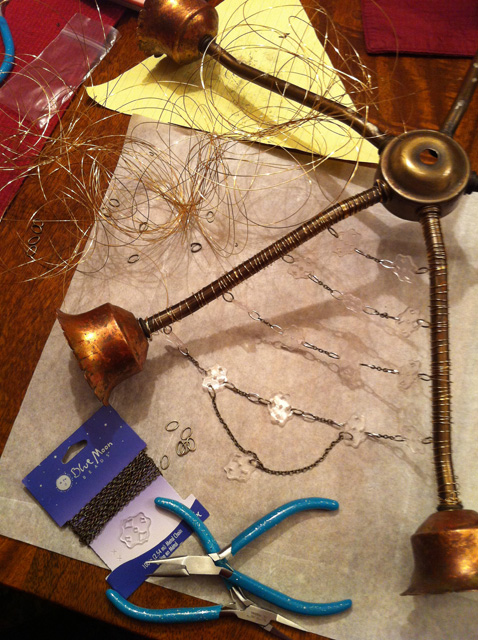
assembly of the jewels with chain and jump rings...and the wire wrapping process...
NOTE TO SELF: don't remove the card from the wire....it makes a mess!
rusted chicken wire - test fit and layout
 
 chicken wire cut to fit and wired to arms

using Fancy Tags Two die and laminated vintage sheet music, cut two tags...
one for the top of the wire section and one for the underside

laminated tags, vintage key and glass bead added to chicken wire section...
dried sheet music section positioned and ready for Ice Resin
  
prior to adding resin, a bit of black Staz-On was "scuffed" onto the sheet music in areas
to add some aging - scalloped cups were temporarily secured to assist with propping up the
framework while the resin cured over-night...bedtime!


Sprightly Sprockets dies were used to cut and emboss sheet aluminum - not aluminum foil
 cut and embossed

test layout onto wide mesh ribbon

 layout progression with mesh ribbon and laminated sheet music strips


mesh ribbon sandwiched between sprockets (back to back) and glued into place -
laminated sheet music was then sewn along the edges to stabilize mesh

sprockets adhered and laminated sheet music sewn into place - yet untrimmed


additional texture, color, and dimension added to sprockets using alcohol inks (butterscotch & slate), Staz-On ink, and a crackle pattern stamp
 
 a section of a vintage, vinyl Twister mat proved the perfect medium to die cut
using a 12" Classic Lace die...


vinyl border was then alcohol inked with butterscotch and slate using a stencil brush

 texture and dimension was added using Staz-On and the same crackle stamp

a third table lamp in my collection was disassembled to obtain the lamp parts used
for the parasol handle...yep, I wearing sweats...gotta be comfy!

a few additional elements, such as an etched metal plate, tulle, mulberry paper, watch/clock parts, jewelry findings, beads, paper tape, etc. were added to the main parasol assembly...then the glass element from one of the chandeliers was added to the table lamp "handle" and secured into place with plumber's putty...the putty was then painted with Modern Masters metallic paint to blend
 
scallop cup inserts were cut from dictionary pages using Petite Scallop Circles
and lightly coated with resin
 
Folly title badge was die cut from shrink plastic using Fancy Tags Three die,
stamped with Staz-On, and then attached with a jump ring

 And Voila...Folly!

CHEERS!


Friday, November 9, 2012

Friends....


This morning, I find myself reflecting on the friendships I've made over the last few years.

Actually, since moving to Oregon in 2004.

Friends from working at the scrapbook store (no longer here), but the friendships made are everlasting and deep.


Friends at out-of-town, creative functions.

Out-of-state friends, met through other friends.

Blogland friends.

Friends from being on the ICE Resin Creative Team.

Friends.

Friends have no boundaries.

The funny thing is, a few of my newest friends live in BOTH Washington (in the same EXACT town!) and California (literally, 15 minutes away!), from where I used to live, but never met when I was there...

Funny how that's happening lately....Brenda (I "met" at Art Camp last year), we immediately recognized each other. You know that whole, "you look REALLY familiar, but I can't place it??!!) Turns out, we lived right across from each other in our little Washington town. Our kiddos were in elementary school together! Small world!

Friends....

Tuesday, October 9, 2012

E-book giveaways

The first two ICE Resin e-Books featuring jewelry and mixed-media artwork by the 2011-2012 Creative Team are now available for purchase.

Preview the first one, Imagine. Create. Explore. Volume 1 Mixed Media Jewelry by clicking below:

https://www.smashwords.com/extreader/read/239780/1/imagine-create-explore-volume-1-mixed-media-jewelry


My Beauty and the Beach necklace is featured on the cover and the method I've used is sure to inspire your creativity using a common beach find, wire, words and Resin. It is just one of my jewelry projects featured in the first book.

My fellow team members share several techniques and processes, as well.

If you like what you see, leave a comment here, and you will receive one chance to win a copy of your very own.

Share & Link Back to this post from your own blog, and a second entry will be made on your behalf. Just leave me a second comment letting me know. :-)

I will be drawing TWO winners on Saturday, October 20th, at noon PST.

Look for a secondary post for the opportunity to win a copy of Volume 2...Jewelry and Vanity where there are MORE inspired creations...

Cheers and Good LUCK!!!

ps. Kathy of Katalina Jewelry has a copy on her blog too! She's drawing on 10/12...check out her blog. She has some GREAT tutorials going on over there from the Halloween Charm Swap we are playing in over at Vintiquities Workshop.

Tuesday, September 11, 2012

To Light...


Sharing and remembering 9.11.2001.

Join me in lighting a candle in remembrance of all those that lost their lives so suddenly on that tragic day; and another in honor of the Heroes and Heroines who were first on-scene, giving themselves so selflessly.


Tuesday, August 28, 2012

Pearls of Wisdom...a Journal through Time.


Pearls of Wisdom…a Journal Through Time


Inspired by a recent trip to Maui, I’ve created a travel journal to document my thoughts and recollections of time spent in the South Pacific. A tropical place where the water is deep blue against the white sand beaches; the cool breeze, having travelled miles across the open ocean, is the freshest to ever fill my lungs; and each lingering day ends with a sunset that is beyond breathtaking.

“Standing at a northern precipice of the island, surrounded by craggy fields of black lava rock, I spot a length of huge rope floating in the churning surf far below. I spend almost an hour mesmerized watching as it’s tossed to and fro, floating on the surface, without ever coming close to the shoreline below. I let my mind wander, as my eyes gaze over the horizon, and I imagine a 3-masted tall ship crashing through the waves so many years ago.  What a majestic sight that must have been. The full white sails aflutter. I envision the beautiful, craftsmanship of the wooden hull and the intricately engineered rigging. Then I’m struck with the thought of the risks those early seafaring men took to get to shore and discover these islands for the first time. As I continue to watch the rope in action, I am in awe.”

***

While I was in Maui, I bought this simple Kraft journal at Barnes and Noble. (Yeah, Maui now has a Barnes and Noble!) I liked that it was plain with the magnetic fold-over flap.

To create what you see here, I used the Spellbinders Grand Calibur machine and Shapeabilities - Fleur De Lis Accents die set to cut a border of nautical wall paper. (Yes, that's a perk of being on the ICE Resin/Spellbinders creative team! Getting to experiment with their products....Yay!)

Using the same die set, I punched four vertical cut-outs in a strip of brown paper lunch bag. With ICE Resin and a chip brush, (I prefer using them over foam brushes or sponges), I resin coated the bag. The bag turned a beautiful transparent caramel color. One of my new favorites! This allows the tall ship image to just "peek" through.


A slight aging was added to the journal by using a brown Cat's Eye ink pad. Simply use the ink pad direct. An older, drier pad works best. I find a newer pad is too wet and will give too drastic of a result, but if that's all you have on hand, dab a Q-tip or sponge on the pad and then apply that onto the journal surface.

With a light coat of Mod Podge, (I prefer to use Matte Finish), I adhered the wall paper to the front and flap of the journal. Once the paper bag section was fully cured, I then layered the lace, chain, rusty binder clip, metal gear and the tiny glass bottle filled with miniature shells with a soldered top.

Lastly, to add a bit more dimension and movement, I punched holes equally down the edge of the flap using my Crop-A-Dile (love that tool - ever since first demo'ing at the now-closed scrapbook store I used to work/teach at) and then added a few jump rings with fresh water pearls. I love how they give it just that extra little something.


***

Thanks for stopping by and be sure to visit ICE Resin and Spellbinders for additional product information.

Cheers and Happy Journalling.... 

Tuesday, July 31, 2012

Expression of Love....

my latest themed media creation

Like many assemblage artists, I’m always looking for ways to use found objects in my work - be it the rusty metal thing-a-ma-jig on the ground, or the left-over frame work housing a chipboard alphabet, or the unused chopsticks from lunch. Whatever the case may be, if the shape or texture or patina is fun, it comes into the studio.

One night we were making Rice-a-Roni as a side-dish, and I took notice of the small, foiled seasoning bag within the box.

Hmmmm, I thought. It’s kraft-colored on the outside and foiled on the inside.

After rinsing the bag and letting it dry overnight, I decided to experiment with its two-toned features.

Shall I resin-coat it?

Shall I use alcohol inks?

Shall I...punch it ?
My large Fiskars scalloped punch would not fit inside the bag, but I found that by folding one side in half, back over itself, and centering the punch, I was able to create the full shape of the punch.


This allowed me to achieve an open design on the front side of the bag - creating a nice little foil frame to showcase a resin-coated paper word, Expression.

With the addition of an assortment of punched flowers attached to shopping bag handle "stems", my old slate chalkboard is now ready for many expressions of love.

The first being this very simple, very sweet sentiment...

If I had a flower for every time you made me smile and laugh,

I'd have a garden to walk in forever...

Click to see my Technique Tuesday how-to video over on the ICE Resin website.


Related Posts Plugin for WordPress, Blogger...