Recently, I've had a couple of people comment "I wish I was in your head!"..."How did you come up with THAT?"... "I would have never thought of THAT!"
Well, join me for a few moments and I'll show you what inspired me to create Folly...my mixed media parasol assemblage.
But first...let me just say, that I'm not a morning person, per se. I do my best thinking either while I'm in the shower...with my eyes closed, while I'm washing my hair...It's something that I started doing when the three boys were little...If you're a mom, you know that shower-time, locked in the bathroom is PEACE ON EARTH and the best time to be with your OWN thoughts!!!
or
At night, while I'm trying to fall asleep... When that "good idea" strikes, I can stay awake for hours...then be exhausted when it's time to wake up...probably why I'm not a morning person...!
So, with this particular creation, I was trying to think "Explore Beyond" - Spellbinders' trademark.
I thought of several things.... I won't bore you, but then I fixated on a chandelier idea...then I thought, what if I turned it upside-down...then...then...then... It was past 2 a.m!
Well, I happened to have two mis-matched light fixtures collecting dust in my studio. One with a wooden finial and another with a glass finial. After a bit of contemplation, I decided to disassemble BOTH and create a NEW object d'art.
I began the process on Friday night and spent a full Saturday - between Friday's wedding and Sunday's baby shower...getting it done! WHEW!!! Love my mochas! LOL
***
So, here we go...
wood finial chandelier - I used the arms, ceiling medallion, lower wooden finial and various hardware pieces
glass finial chandelier - I used the scallop cups, center glass finial and the hanger hardware

the disassembly process ... sorting and deciding
the assembly process begins...remove the lacy cups and add the scalloped cups ...
different shape...different direction...different effect
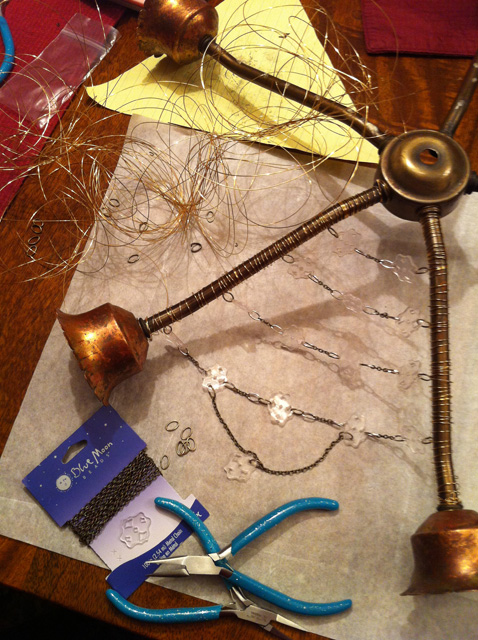
final top finial stack selection
finial stack test fit for design aesthetic
pattern-making for player piano, resin-paper section
arm spacing traced, pattern cut, and test fit to arms
vintage Rythmodik player-piano music roll

test layout

after cutting the music paper, a Fancy Tags Two die was positioned to be used as a stamp
using a Fancy Tags Two die and an Art Bin magnetic storage plate as a stamp positioner .. and the leaf seam/edge of my dining room table as a T-square, the die was inked with black Staz-On ink
Radiant Rain Shimmering Mist was spritzed over the sheet music

using the Grand Calibur, Pendants Lattice die, and clear shrink plastic,
numerous pieces were cut and shrunk for the clear jewels section

after shrinking
initial jewel layout that did not become part of the final design -
a horizontal pattern was a better design between the arms
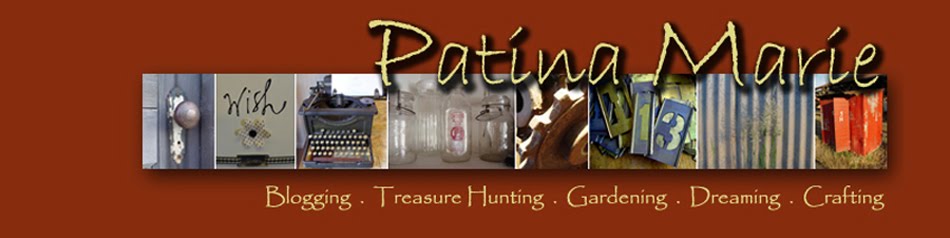
assembly of the jewels with chain and jump rings...and the wire wrapping process...
NOTE TO SELF: don't remove the card from the wire....it makes a mess!
rusted chicken wire - test fit and layout
chicken wire cut to fit and wired to arms
using Fancy Tags Two die and laminated vintage sheet music, cut two tags...
one for the top of the wire section and one for the underside
laminated tags, vintage key and glass bead added to chicken wire section...
dried sheet music section positioned and ready for Ice Resin
prior to adding resin, a bit of black Staz-On was "scuffed" onto the sheet music in areas
to add some aging - scalloped cups were temporarily secured to assist with propping up the
framework while the resin cured over-night...bedtime!

Sprightly Sprockets dies were used to cut and emboss sheet aluminum - not aluminum foil

cut and embossed
test layout onto wide mesh ribbon

layout progression with mesh ribbon and laminated sheet music strips

mesh ribbon sandwiched between sprockets (back to back) and glued into place -
laminated sheet music was then sewn along the edges to stabilize mesh
sprockets adhered and laminated sheet music sewn into place - yet untrimmed

additional texture, color, and dimension added to sprockets using alcohol inks (butterscotch & slate), Staz-On ink, and a crackle pattern stamp
a section of a vintage, vinyl Twister mat proved the perfect medium to die cut
using a 12" Classic Lace die...
vinyl border was then alcohol inked with butterscotch and slate using a stencil brush

texture and dimension was added using Staz-On and the same crackle stamp
a third table lamp in my collection was disassembled to obtain the lamp parts used
for the parasol handle...yep, I wearing sweats...gotta be comfy!
a few additional elements, such as an etched metal plate, tulle, mulberry paper, watch/clock parts, jewelry findings, beads, paper tape, etc. were added to the main parasol assembly...then the glass element from one of the chandeliers was added to the table lamp "handle" and secured into place with plumber's putty...the putty was then painted with Modern Masters metallic paint to blend
scallop cup inserts were cut from dictionary pages using Petite Scallop Circles
and lightly coated with resin
Folly title badge was die cut from shrink plastic using Fancy Tags Three die,
stamped with Staz-On, and then attached with a jump ring
And Voila...Folly!
CHEERS!


 I'm SO excited to share and brighten someone else's day... Folly...a parasol of hope...that's my new little acorn's goal.


.JPG)


